With summer approaching, parents know that they’re going to have to start coming up with fun activities to keep the kids entertained while also building and cultivating important skills. One of the best ways to do that is to find some arts and crafts for kids. Arts and crafts to do at home are a great way to keep your children busy in an economical and fun way.
Not only are they a good source of entertainment, but art activities for kids also help them to develop better motor skills while fostering an interest in the arts. Who knows what arts and crafts might unlock a hidden interest for your children that pushes them to nurture their creativity or their interest in the arts.
To help parents get started, we’ve put together a list of our five favorite easy arts and crafts for kids that children of all ages can have fun with and participate in. Not to mention you’re going to end up with some lovely pieces of art courtesy of your kids!
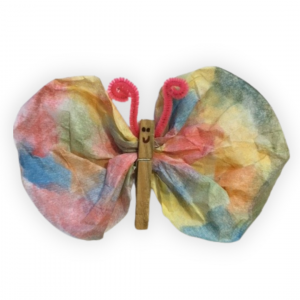
1. Camp Tournesol Papillon Craft

Materials:
- Coffee filter
- Paint brush
- Pipe cleaner
- Wooden clothespin
- Paint of many colours (and a cup of water to make the colours less opaque)
- Marker
One of our camp favorites, our papillon or butterfly craft always gets the kids excited and usually results in some beautiful crafts as well. To start, lay the filter flat and paint it. Next, you’ll want to draw a face on the clothespin, a step which the kids can definitely have some fun with.
After that, pinch in the middle of the filter and secure the clothespin there. Then, cut half of a pipe cleaner and curl the ends to make the antennae before bending them into a “U” shape. To finish it off, clip the antenna into the clothespin, and voila!
2. Sunflower - Tournesol Craft
Materials:
- 1 sheet of white paper
- paint brushes
- Green, yellow and brown (or black) paint
It wouldn’t be Camp Tournesol without a fun sunflower-inspired craft! Another favorite among our campers, this is an easy arts and crafts activity for kids that is perfect for summertime. To get started, you will create the sunflower stem by painting a thick line using green paint on your paper.
Once you’re done with the stem, take your yellow paint and paint your hand using a paintbrush. Now that your hand is covered in yellow paint, you’re ready to press it against the paper to create four to five handprints. Make sure your handprints are made in a circular shape, because these will be your sunflower petals! When you’re done with your petals, use your black or brown paint to create the circle in the middle of the petal circle which will be the center of your sunflower.
Materials
- Juice boxes
- Colored paper
- Straws
- Paint
- Paint brush
- Scissors
- Tape
One of the most popular aspects of our camps are our water days, so of course we’ve got water-inspired arts and crafts for kids as well! What’s more fun than playing in the water, especially on a hot summer’s day? To start this craft you poke a small hole in the juice boxes about one third down from the top so you can drain the juice for drinking later.
Next up, you can paint the juice box, which is your boat, with any colors or themes or pictures your children want! This step really allows their creativity to shine. After the boat’s are painted, simply cut out triangle shapes from colored paper to make yourself some sails. A few different color options don’t hurt.
You then fold your paper sail in half and tape the straw to the inside fold of your sail. You can also use wooden skewers or popsicle sticks instead of a straw if you prefer. Make a round piece of tape to seal the two ends of the sail together from the inside, stick your straw into the hole you made in the boat, and you’re ready to sail!
Materials
- Toilet paper roll
- Can also use paper towel rolls cut in half
- Pink paint
- Black marker
- Cardstock (white, black, and yellow)
- Googly eyes
- Black pipe cleaner
- Black pom poms
- Glue
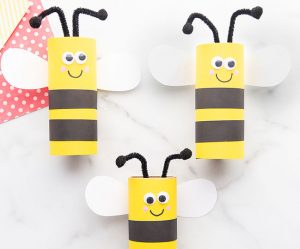
Arts and crafts to do at home are the best kind, and this toilet paper roll bee craft is another one you can do inside your home, out on the porch, or anywhere you want to be to enjoy a summer day! To start, cut rectangular pieces of yellow cardstock to wrap around the paper roll, allowing for a little bit of overlap so that you can glue or tape down the seam. Next, cut two slim pieces of black cardstock and glue them around the paper roll to make your bee’s stripes while leaving space at the top for the face.
Now you can glue your googly eyes to the front and use a black marker to draw the bee’s mouth. To make cheeks, dab a bit of pink paint on either side of the mouth, which makes the bees all the cuter. Then, bend a black pipe cleaner into a “V” shape that bends back down at the ends. After that glue your pom poms to each end of the pipe cleaner and glue the pipe cleaner to the inside top of the paper roll.
At this point you can cut out your bee’s wings from the white cardstock and glue or tape them to the back of the bee, and you’re done! These were the basic steps but feel free to allow the kids to decorate with a lot more creativity the way they prefer. You can also use paint or markers for the face and stripes if you don’t have all the materials!
Materials
- Paper plates
- Acrylic paint in black and your choice of other colors
- Googly eyes
- Glue
- Black felt
- Scissors
- Hole punch
- Paper fastener
- Pouncer sponges (optional)
- Paintbrushes
Ladybugs are some of the prettiest insects you’ll come across in the summer, so it’s no surprise they also make super cute crafts as well! To begin the paper plate ladybug craft, paint one paper plate black and the other in whatever other color or design your kid prefers, this is where they can really get creative! After setting them aside to dry, cut out a half circle from the black felt for the ladybug’s head.
Once your paint is dry, take your colorful plate and start making polka dots by dabbing your pouncer sponge into some black paint. If you don’t have a pouncer sponge, you can always just paint them on manually. Once the polka dots have dried, take the colorful paper plate, cut it in half and line those two halves over the black paper plate. Spread the two color halves of your colored plate a bit to spread the ladybug’s wings.
Then, hold it at the top and poke a hole through the top of the wings as well as the black plate underneath and push the fastener through the hole to secure it. After that, glue the felt head on top of where the fastener is and to finish up, glue your googly eyes onto the head!
We hope you’ve enjoyed our list of the best summer-themed crafts for kids! Crafts are a great way to help your little one improve their skills and boost their creativity. If you have any favourite summer crafts, make sure to leave them in the comments below!

